|
Since many of our recipes to this point have been Gluten-free, I thought it was time to start uploading all our Gluten-FULL recipes as well. What better recipe to start with than a basic recipe that has an abundance of potential: My Traditional Whole Wheat Sourdough Bread recipe. This recipe is one I have used for years and uses only the basic storage ingredients. The nice thing about this recipe, too, is that if you are running low on salt or sugar, even oil, you can eliminate those and still come up with a halfway decent loaf of bread. I will say that the touch of sugar and salt do give it an added flavor, and the oil just makes the dough generally softer. Yet it can be made with just the starter, water, and added flour. This is a great recipe to use for making so many other goodies including soft pretzels, cinnamon rolls, sticky buns, or dinner rolls. The possibilities are only limited by your imagination. In fact, as I type this blog and tie up the loose ends on the recipe, a batch of Garlic Knots and loaf of Challah Bread for Sabbath are rising on the stove for nashing on during meals this weekend. What will YOU use it for? Blessings, Judith Traditional Whole Wheat Sourdough Bread Yield: 2 nice loaves or 2 batches of rolls 1 - 1 1/2 Cups sourdough starter 1 3/4 cup water 1 tsp salt 3 Tbsp sugar 2 Tbsp oil (I prefer Olive Oil) 6-8 Cups of Whole Wheat Flour Mix together the starter, water, salt, sugar, oil, and 2 Cups of the whole wheat flour. Mix well with a spatula or wooden spoon. Add more flour as needed and mix well. Continue adding flour until it can no longer be stirred in with your spoon or spatula. Sprinkle flour out onto the counter top where you will be kneading the dough. Pour the dough onto the floured counter, sprinkle more flour on top of dough. Mix with hands and add more flour as needed to make a soft, but not too sticky dough. You should be able to easily knead the dough without it sticking too much to your hands - this should not take more than 2-4 minutes. Keep extra flour close by as it may be needed to keep the dough from sticking to your kneading surface. Set your timer for 10 minutes and knead the dough for a full 10 minutes for the best consistency. This is a great workout for your arms! Yes, ten minutes really is needed to fully release the gluten in your whole wheat dough! There are times I even feel the need to knead for an additional few minutes to ensure the elasticity of the dough. When the timer goes off, shape your dough into the final product. Allow to rise for the amount required in the recipe for your final product. This could take from 1-7 hours, depending on final product and temperature of the room - a cooler room will take longer), or until nicely doubled. Please alot for this amount of time before serving in your prep time - in other words, if you want bread for breakfast and it's chilly in the house, make sure to make it up the night before to allow for proper rising time before baking a fresh hot loaf for morning! Loaves: Cut the dough in half before rising. Shape into loaves and place into greased loaf pans. Allow to rise until double, usually about 4-7 hours for loaves. Bake in a preheated 375 F oven for 40-45 minutes. Brush with olive oil or butter, allow to cool slightly before removing from pan. Cut, serve or store. NOTE: I often split the batch and use 1/2 to make pretzel nibs and 1/2 to make rolls or a loaf of bread! Recipe Is Great For: Soft Pretzels! Bagels Cinnamon Rolls Cinnamon Swirl Bread Garlic Knots Cloverleaf Rolls Dinner Rolls Hamburger and Hotdog Buns Sandwich Rolls Pizza Crust Whatever your imagination can come up with!!! Possibilities are endless! I have not been one to use white flour in a very long time. In fact, I can't recall the last time I honestly bought a bag of it from the store. I think it was about 5 years ago to make some recipe that "required" it. The white flour sat around for so long, that it turned into a block of white concrete in the New Jersey humidity! I ended up making the recipe that "required" it with whole wheat flour and it must have turned out okay because no one seems to recall a failed flour recipe! Sourdough starter is one of those recipes that I will never make with white flour. Although some people may claim that you can't make the starter without it, white flour has not been around nearly as long as sourdough has. In fact, sourdough is closest to the biblical recipe as one can get these days. At least until someone discovers a recipe card in the mid-eastern deserts, that is! It has been shown repeatedly that whole grains tend to have a better and often higher natural yeast content than any pre-ground, processed flour. This has also been my personal experience over the years. The starter I have created from whole wheat, faro or einkorn has been much more active, and healthier than anything I attempted "back in the day" with white flour. Because of this evidence, I much prefer to create our starter from the simple, old fashioned freshly ground whole grains. Here is the recipe that I have gotten accustomed to using. It is very simple to create because it uses two ingredients that many people will have on hand in their food storage: Water and grains ground into flour. ENJOY!!!! Basic Whole Wheat Sourdough Starter NOTE: Use this recipe for our Traditional Whole Wheat Sourdough To begin your starter: 1 cup whole wheat flour 1/2 cup room temperature, filtered water (about 70 degrees) A glass jar, crock or bowl that can be easily, yet loosely covered. I like to use a glass quart size canning jar, a metal ring and a coffee filter. Place the flour and water into the jar and stir until very well combined, making sure that there is no dry flour left. Cover with the coffee filter and place the metal ring on. Let the mixture sit at room temperature (about 68-75 degrees is optimal) for 24 hours. Day 2: There may or may not be activity showing as yet - activity would be little bubbles in the mix or there appearing to be more mix than the day before. It may just look like what you started with on day one. Either way, take 1/2 of the mixture, set it aside in a bowl (See below for ideas to do with the discarded starter so that you do not waste). To the mix remaining in the jar, add 1/2 cup of room temperature, filtered water and 1 scant Cup of whole grain flour. Mix well, recover, and let mixture rest at room temperature for another 24 hours. Day 3: By day 3 you should be seeing some activity - bubbles, evidence of expanding dough. This is the day you will start feeding the dough 2 times per day. Try to feed it as evenly spaced apart as possible - 12 hours. For each feeding, stir down the dough, then take a generous 1/2 cup of starter and mix it with 1 scant cup of whole wheat flour with 1/2 cup room temperature, filtered water. Stir thoroughly, cover, and set aside for approx 12 hours. Remember to use your discarded starter for something, or set it aside to use later with additional discarded starter. Day 4: Repeat steps for Day 3. Day 5: Repeat steps for Day 3. By the end of Day 5, you may start to see that the starter is “doubling" You should also see lots of bubbles, and it should have a tangy, tart, or “sour” but pleasant aroma. If it is not this active as yet, you may need to continue the feeding process for days 6 and 7. (On rare occasions, or in colder weather, it may take a bit longer to develop fully) -- When the starter has reached the point described on Day 5, you will want to give it one final feeding before storing in the refrigerator. Feed as usual, mix well, let the starter rest for 4-8 hours to see a generous amount of bubbles breaking the surface of the starter. Now you may place it in the refrigerator for “permanent” storage. Make sure to feed your starter at least once per week with 1 Scant cup of whole wheat flour and 1/2 cup water, just as you have fed it during the process. By removing all but 1/2 cup from the permanent container, setting aside the removed portion to make a loaf of bread, rolls, or other recipe. To the remaining 1/2 cup add your water and flour. I like to leave it out on the counter for about an hour to rest before putting it back into the refrigerator, just to give it a little time to start its process. Now you can enjoy fresh sourdough bread products any time you would like to! NOTE: If I allow the starter to set in the fridge for a week, I often see a brown or dark liquid on top of the starter. This is a sign that your starter is HUNGRY! Feed it! It is best that you not allow it to get to that point, though, so that you do not starve it to the point of inactivity. This liquid is commonly known as "hooch" and is a naturally occurring alcohol. YES, this should be pour off and discarded before feeding your starter. I find that if "hooch" happens more often, it means I need to feed it more often. More troubleshooting tips can be found here: I am always a fan of waste-not-want-not, so I do not dispose of our sourdough starter when we are starting a new batch every spring. When the recipe says to discard it, I always discard it right into a bowl and make pretzels, bagels, or muffins from it. BUT my favorite is to make whole wheat crackers and have them with some cheese. Here's my favorite recipe for a tasty snack: Okay, maybe this is not new to some people, but it was new to us. We were bored with the same old recipes for quinoa as salad or side dish and it was the only grain I actually had left in the cupboard that day. I went digging around and found an old recipe from a friend for Quinoa Patties. I didn't quite like all of the flavorings that she had added to the recipe, but used it as a pattern to devise our own flavorful taste treat. Since creating our recipe, I have learned that Fried and even Baked Quinoa patties are a common recipe used by countless people. The internet is packed full of other recipes for them that I did not know existed! Apparently, there are thousands of people out there who loved them as much as we did. This recipe is great to make with leftover Quinoa, too. In fact, the next time we boiled up some quinoa, I went ahead and doubled the recipe so that I would have enough for the next day to make patties! Use your imagination with this one to flavor it up any way you like. They are even tasty served with sauces. Enjoy!!! Fried Quinoa Patties 1 Cup Quinoa 2 Cups Water 1 tsp salt Bring to a boil, simmer until done. 1 Med. to Lg Onion, very finely chopped 1 Cup Potato flakes 1 Tbsp chia seeds, ground 1 Tbsp flax seeds, ground 6 Tbsp warm water Mix together these two, then enough water to make an egg-like consistency. Set aside. Once quinoa is done, mix all ingredients together well in a bowl. Heat Griddle to 350-400 degrees F. When heated, drizzle with oil, spread oil, and then plop mixture onto hot griddle by 1/4-1/3 cup dollops, spread or press it out until pancake thickness. Allow to fry until heated thoroughly throughout and nicely dark brown and crispy. Flip, and brown the other side. Serve hot with bbq sauce, ketchup, mustard, sriracha sauce, or other desired dipping sauces. Will also go delish with mayonaisse and toppings on a bun! OR With nicely fried eggs. Additional options: chopped peppers, jalepenos, garlic, or other herbs as desired. Thinking on the fly is something you need to learn now.
One very precious commodity during a food storage emergency can be WATER. Recently Jim got an idea and we decided to give it a try. We had no idea how it would turn out, but what could go wrong with a food storage experiment, right?? His idea: Cheese sauce with pepper juice. Scenario: He wanted some cheese sauce to dip his dinner rolls in - they were a bit dry and he thought cheese sauce would fix it. I asked him to mix the cheddar cheese powder up with a little water while I fixed the rest of supper. He got the idea to use some of the jalepeno pepper juice from a jar of pickled peppers in the fridge. We sat down to dinner where he tried his before I did. He told me to hurry up and try it before I had eaten all my rolls dipped in our broccoli rice dinner. I grabbed a roll, dipped it in my cheesy sauce, and WOW!!! OH MY GOODNESS!!! That was the best cheese sauce I ever tasted. Lesson learned: Don’t use water - use pepper juice!!! Of course if you have young-uns in the house who don’t like hot food you might need to mix theirs weaker or separately from yours. I have to say, though, this was awesome! From now on we are going to save as much of that pickled pepper juice as we can keep around in the fridge. And not just the Jalepeno pepper juice - the banana pepper juice is going to be saved, too. We already learned it makes great farm cheese from powdered milk, and now we have found an extra use for it. I bet it will taste even better on fresh, hot sourdough pretzels right from the oven - maybe tomorrow!!! Basic Pepper Cheese Sauce Pretzel Dip 1/2 Cup Cheddar Cheese Powder 1-2 Tbsp pepper juice Mix well, serve. Great with fresh hot sour dough pretzels, rolls, or as nacho cheese on chips! Need your cheese sauce thicker or thinner? Simply reduce or increase the amount of pepper juice. Need it milder? Use half pepper juice and half water. Most of all, USE YOUR IMAGINATION! You can even add the hot peppers if you would like to. Well, the weather says we may get snow this weekend around here - so it is time to dig into the soup pot and pull out some warm and wonderful ideas to get ready for the "snow storm". Our Creamy Tomato Soup recipe is great
Creamy Tomato Soup 6 Cups Water 1 Cup Tomato Powder 1 Cup Freeze Dried Diced tomatoes, rehydrated 1/4 cup chopped chives 1/2 tsp onion powder 1/2 tsp garlic powder 1 tsp dry basil 1 Tbsp sugar 4 Tbsp Butter powder 4 Tbsp Sour Cream powder Salt and pepper to taste Bring the 6 cups of water to boil in a large pot. Add the Tomato Powder and stir to mix well. A whisk works wonders to mix the tomato powder in. Reduce heat to medium low. Add the Diced tomatoes, chives, onion and garlic powders, basil and mix well. Whisk in the butter and sour cream powders until creamy. Reduce to low and allow flavors to blend for about 10-15 minutes. Serve hot. Better than canned soup!!! Baked Oatmeal Version 2.0
After a lot of experimentation over the past year, we have come up with a second version of the Baked Oatmeal recipe I posted a while back. This version is thicker, fluffier, and still feeds 6 people comfortably. We felt it has a better flavor and is not near as dry as the original recipe we used for so long. I hope that you enjoy this one as much as the old recipe. This Version 2.0 is also just as versatile as you want it to be by adding additional ingredients such as nuts, fruits, coconut or by varying the spices you add to the mix. Bake some up and enjoy! Baked Oatmeal Version 2.0 In a large bowl, combine all the dry ingredients very well: 2 1/2 Cups Oats (Both regular and instant oats work well in this recipe) 2 Tbsp Ground Flax seed 2 Tbsp ground chia seeds 1/4-1/2 Cup sweetener - Sugar, honey, or maple syrup work well in this recipe. (If using honey or maple, decrease the water by the amount 4 slightly heaping Tbsp THRIVE Milk powder 1 tsp cinnamon 1 1/2 tsp baking powder 2 1/2 Cups water 4 eggs, beaten 1/3 cup Coconut oil, melted Pour the water over the dry ingredients, then the eggs. Mix well. Gently pour the melted coconut oil over and stir well. Pour into an oiled 9X9 pan and bake at 375 for 30-35 minutes. Remove from oven, allow to cool for 5 minutes before serving. Delicious served with a pat of butter melted on top, or with some fresh fruit poured over. Baked oatmeal is wonderful with added fruits or nuts before baking, too. Toss in some walnuts, pecans, almonds, apples, or even diced pears or peaches. Taco or Chicken Burrito Bowls
This recipe is great served just over the rice or rolled up in some soft tortillas like a burrito filled with your favorites. One friend even suggested serving it in hard taco shells as taco filling because it is packed full of good ingredients for a hearty, filling meal. I love to make this one in advance, and put it in either single serve dishes or in a large casserole. Then slice and dice all your fresh produce in advance, too, and this way, you can re-heat the casserole in the evening or the next day for an easy meal for lunch or dinner. What a perfect recipe for those times when you are running around with little time to cook, or for early prep and serve on Sabbath with family. Plus, single servings means people can heat theirs when they are ready and dress it up however they like. Taco or Chicken Burrito Bowls Serves 4-8 People 1 Batch of Easy Enchilada Sauce 1 1/2 Cups Freeze Dried Chopped Chicken plus 3/4 Cup of warm water 1 Cup Instant White or Brown Rice, cooked 2 Cups Freeze Dried Instant Black Beans, rehydrated or 2 Cans your favorite beans (or 1 Cup Dry Beans that has been cooked, rinsed, and drained, We like Anasazi Beans) 1 Cup Freeze Dried Sweet Corn plus 1/2 Cup Water TOPPINGS: Cheese, shredded Onions chopped Fresh or pickled Jalepenos Salsa Tomatoes, diced Guacamole Lettuce, chopped Sour Cream Black olives Rehydrate all freeze dried products. Make sure your Easy Enchilada Sauce is heated through and that rice is cooked. In a large bowl, mix together the cooked rice, beans, corn and the chicken. Mix thoroughly and then Scoop into individual bowls or a casserole dish. Cook in a 350 oven for approx 20 minutes, until heated through. Remove from oven, and serve with toppings. A perfect meal for a summer evening with some fresh vegetables harvested and chopped from your survival garden or produce stand. This one is also great served in soft tortillas or our Gluten Free Naan Bread. Even a side of fresh, hot cornbread would go nicely. This one was created on a whim one night when my husband said he was in the mood for a good old fashioned meal. I asked what he was in the mood for and he said something with gravy. I had been wondering if you could make a meatloaf out of the freeze dried meats from Thrive, and there were several recipes I found, but they all used the Freeze dried ground meat. I figured I would do like I did when I made meatballs a few weeks ago, and I crushed the meat chunks until it was almost powdered. Then placed it a bowl with the water, and followed the rest of my standard meatloaf recipe. It worked great. It was too soft to place in a square baking dish because it would not hold is shape. It also wasn't quite enough meat to bake in a large loaf pan, so I used two small loaf pans instead. I oiled them up a little bit, placed the meat mix in and baked! I served it with a side of mashed potatoes and some gravy made with our Chicken Bullion, as well as a healthy helping of Freeze dried corn cooked to perfection. It was definitely that old fashioned home cooked meal Jim had been looking for. I had a little of one loaf left over for the next day and I sliced it up to fry with some eggs. It just needed to heat through and brown up a little bit. OH MY GOODNESS! It was wonderful. It even tasted just like a slice of sausage. My next goal is to make it ahead, refrigerate one and freeze one. Just to see how it works. Will keep you posted. Give it a try and see what your family thinks - I hope you enjoy it as much as we did! Food Storage Chicken Meatloaf 2-5 servings 1 1/2 Cup Freeze Dried Chicken Chunks, crushed as small as possible so that it resembles dried ground meat (this is great for that powder at the bottom of the can!) 1 Cup water 2/3 Cups Oats 1/4 Cup Milk 2 Eggs 1 tsp Rosemary 1/2 tsp Garlic powder, or more to taste 1/2 tsp Onion powder, or more to taste 1/2 tsp black Pepper, or more to taste Salt to taste May also add any other spices or herbs you usually like to add to your meatloaf. In a large bowl, place the crushed chicken and 1 Cup water. Mix well and allow to rehydrate fully, then add the rest of ingredients to the bowl. Mix all ingredients well. Separate evenly and place each half into one of two prepared small loaf pans, pack each loaf firmly. Bake in a 375 degree F preheated oven for 20-25 minutes until baked firm. Remove from oven and allow to sit for 5 minutes to cool. Remove from pans, slice and serve!! This is excellent served as you would any meatloaf with gravy, mashed potatoes, and a side of corn! Also wonderful with a ketchup sauce like the diners serve. Serves 2 to 4 people. Want some sausage for breakfast? Place it in the fridge over night and slice it in the morning. Fry it in a little oil and serve it with your eggs. How about making sausage and egg sandwiches? Or maybe some sausage and gravy from your meatloaf? This makes a great, versatile meat product for every day AND a great home cooked meal. What To Do With All Those Freeze Dried Cans
The other day someone asked what they could do with all those left over cans from their freeze dried foods, and several people were tossing around ideas. One woman recommended taking a dozen or so, and sticking them into the freezer filled with water as an emergency back up ice supply for when you lose power. She said she keeps a layer at the bottom of her freezer at all times just in case. I thought at the time that this idea was a waste - especially of valuable freezer space for frozen foods you have stored from your garden. As the days went on, though, I thought it might be a minor sacrifice of a small amount of space to ensure that you won’t lose all those foods in a sudden outage. Now it started to make sense, but I had not bothered to do it yet because I just didn’t take the time. Then it happened. No, we didn’t lose power, but close enough. The brand new refrigerator stopped working properly and the milk turned into cottage cheese over night. The top freezer was still working perfectly, but the refrigerator was warm. Thank goodness we didn’t have alot of spoilable foods in there, but we did have butter, milk, and 1/2 a meatloaf. The meatloaf jumped up to the freezer and I put the milk into a bowl full of ice. The butter was cool enough to keep until I could take care of things. I called the manufacturer and scheduled an appointment because it is under warranty, but they can’t come until several days from now. A week or two ago we had just thrown out about 4-6 empty cans that I wasn’t using for anything, and I couldn’t figure out what to do with. That was BEFORE the conversation I had the other day with friends. I went through my cupboard really quick and grabbed several almost empty cans then went to it. Two cans I filled 1/3 of the way to stick the milk jug into directly - it’s only a 1/2 gallon jug so I figured this will work great. Then I filled two cans completely to place one at a time in the fridge to keep it as cold as I possibly could. All total, I stuck four cans of ice in the freezer so that I can preserve the milk and butter and ensure we don’t lose any of the mustard and ketchup. Thinking on the fly - I guess maybe all those years of prepping paid off in that respect, but had I been a little more prepared with some things already done, I would have been more able to live up to my claim of being a prepper! This one is a nice recipe for a chilly afternoon with that same old fashioned flavor as Mom's stuffed peppers and the convenience of a quick serve casserole. It goes great with some fresh baked rolls or garlic bread.
Tuck this one away, too, in the fridge for the next day as a make ahead and bake later meal. I love to use these kinds of casseroles or meals for Sabbath meals because I don't have to cook that day, just reheat and serve! Stuffed Pepper Casserole Serves 4-6 1 - 1 1/2 Cups Freeze Dried Chicken Chunks plus 3/4 Cup water (May also use THRIVE Beef, rehydrated) 2 Tbsp EVOO (Extra virgin olive oil) 1/2 Cup Freeze Dried Onion, rehydrated, or diced yellow onion 3 Cloves garlic, finely chopped 1 Cup Freeze Dried Red and Green Peppers plus 1/4-1/2 Cup water 1/2 teaspoon salt 1/4 teaspoon pepper 1 can (14.5 oz) diced tomatoes, undrained 2 Cups water and 2 tsp Chicken Bouillon 1 can (8 oz) tomato sauce 1 tablespoon soy sauce (optional) 1 teaspoon Italian seasoning 1 cup uncooked Instant Brown Rice 1 Cup Freeze Dried Cheddar, rehydrated, or 1/2 Cup Freeze Dried Cheddar plus 1/2 Cup Freeze Dried Monterey Jack Directions In 4-quart saucepan, sautee onion and garlic over medium-high heat 5 to 7 minutes, then add the rehydrated meat. Stir until heated through. Add bell peppers, salt and pepper. Heat through. (If you used fresh meat you may need to drain off some of the fat at this point.) Reduce heat to medium; add tomatoes, broth, tomato sauce, soy sauce and Italian seasoning. Stir until well combined. Heat to boiling. Add uncooked rice. Return to boiling; reduce heat to low. Cover and simmer about 25 minutes or until rice is tender. Place in a baking dish, sprinkle with cheese, and either cool for cooking later in the day or next day, or place immediately in a 350 degree F oven and bake for approx. 15-20 minutes. Serve hot with rolls. Spinach, kale, escarole, collard greens, they are all the same. I buy them either fresh by the pound or in a fresh prepackaged bag, stick them in the refrigerator with every intention of using them in salads, sautees or soups. Then I either forget they are there, or cook other ideas through the week, and there they sit. If I let it sit too long, it ends up getting squishy and slimy and crossing that line into the “unknown veggie” zone - that deep, dark, green, liquefied state. I have, over the years, thrown away way too much food like that but I keep hearing my grampa’s words in the back of my head, ‘Waste not, want not.”
Let’s face it - the economy is not as good as they would like us to believe, and food prices are going up. I saw apples the other day - not that long ago, a couple years at most, a 3 lb bag in season could be bought for anywhere from $.99 to $1.99 on sale. The ad I saw online was for a local grocery and they were selling a 3 lb bag of apples for $4.99. This week, the out of state apples are about $2.75 a bag for the 3 lb bag. That is at least a little better, but it makes you put things into perspective so you can start finding ways to save money AND preserve foods. A couple years ago I had the brilliant idea to nip my waste in the bud by grabbing whatever is left at the end of the week and throwing it in the freezer, often just as it is. Sometimes I will slip it into a zipper bag for better protection from freezer burn, but often I just toss it on a shelf for use later. I know someone out there will tell me that this is not the proper way to freeze foods, and that I truly should take the time to blanch the veggies. Often I am in a hurry and just am not willing to take the time to blanch, chill, dry, package, freeze, when I can just grab the bag and throw it on a shelf. I have also been known to take the plastic tubs full of organic spinach and just toss them in as well. These frozen greens are great to throw in soups, stews, sautees, quiche, or anywhere you would toss fresh greens then allow to steam. We have also just grabbed a bag out, steamed it and served it with olive oil or butter as a quick and easy side dish. I find, personally, if I do this with the tougher greens like kale and collard they do work better in meals, too, because my random freezing breaks down some of the wood stems better than steaming, then adding to meals. And just imagine the energy I am saving by not precooking a small bag or two, then cooking again later! Yes, you will definitely read all over the internet and in books as well as be advised by those at every cooperative extension that blanching is a MUST to stop all enzyme activity and to reduce the nutrient loss of vegetables that are frozen. Yes, you will also see that freezing without blanching will “change the texture” or flavor of the vegetables. Some will even tell you that you run the risk of the non-blanched vegetables to continue to decompose or “go bad” while in the freezer. Over the years I have heard many people say that not blanching the greens makes them flavorless, but I can only speak from experience here - and that has not been the case. We have still used the greens with great results in many different types of dishes, BUT we make sure to use them within a couple of months of sticking them in the freezer. Often times we use them within a a week or two by not buying more fresh until the frozen ones are gone. Please note, I would NOT do this with any other vegetable that I am going to freeze. If I am going to store corn, green beans, broccoli, cauliflower, or any other vegetable, I will always blanch those first. I will take the time to set aside a day, pick or buy in bulk, and process as much as possible for the freezer all at once. These vegetables tend to be the ones that I store for longer periods of time, though - sometimes up to a full year. The greens I freeze are top on our list of things to use and I make sure to schedule them in somewhere within 3 months of throwing them in the freezer because this is just a stop-gap measure to save what I over bought and didn’t use. Waste not, want not. If you prefer to blanch your greens first, make sure you study and learn the proper equipment to have on hand, as well as the specific amount of time for each vegetable you plan to blanch/freeze. Every vegetable is different, and therefore needs a different time under the hot water to stop the enzyme activity and to prepare them for deep freezing. In a pinch, this method of quick-freeze and use for greens may help you salvage what you might normally throw away. It could help you stop wasting money as well. On the other hand, if you have a compost heap, you can always toss it there and “grow” some delicious dirt! Easy Potato and Egg Casserole, is one that may quickly become a favorite for the family.
If you are tired of plain eggs, and just don't want a quiche, why not try this great recipe? A simple way to make potatoes and eggs without all that standing over the stove! Potato and Egg Breakfast Casserole Feeds 4-6 as is. Need a bigger recipe? Double it and bake it in a 13X9X2. Just remember to increase your baking time accordingly. 2 Cups Freeze Dried Potato Dices plus 3 Cups HOT water 1 Cup Freeze Dried Cheddar plus 2-3 Tbsp water 1/4 Cup Freeze Dried Onions plus 1/2 Tbsp water 1/4 Cup Freeze Dried Dices Chili Peppers plus 2 Tbsp water 1/4 Cup Olive oil 6-8 eggs or 12-16 Tbsp Freeze Dried Scrambled egg mix plus water as per package directions 1/2 Cup Milk Salt and pepper to taste Add water to potato dices in a bowl and let set for 10 minutes. Add water to Cheddar and let set for 10 minute. Add water to Onions and Chili peppers in the same bowl and let set. Mix up eggs and milk or Freeze Dried Scrambled eggs, water, and milk. Take potatoes, and drain excess water if any, and mix with 1/3 of the cheddar cheese. Mix together well. Add onions and chili peppers, olive oil and salt and pepper to taste. Press into the bottom and sides of a greased pie plate (9 inches works well). Make sure this “crust” is pressed firmly. Place in a preheated 450 degree oven and bake for approx. 15-18 minutes until golden brown on the bottom. Remove from oven and pour the egg mixture over top. Replace in oven for 8 minutes. Sprinkle with cheddar cheese and replace in the oven for another 5-10 minutes or until a knife inserted in the center comes out clean. Serve hot with fresh fruit or juice. Delicious! 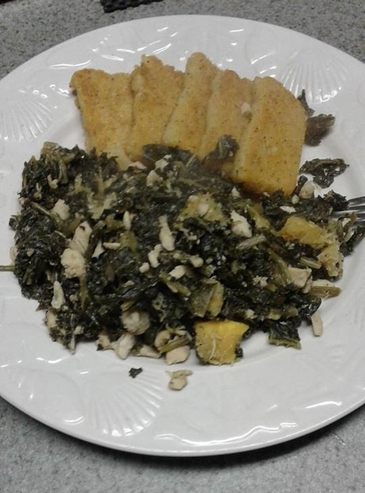 Fresh Homemade Polenta served with sautéed Kale, butternut squash, and a little THRIVE Chicken for protein. Leave out the chicken for a nice vegetarian dish! This is one of the easiest recipes to make from your food storage and can be served so many ways. As a side dish with a sauce of some type - like a fresh marinara, with fried eggs for breakfast, or how about with some delicious fresh diced tomatoes and basil from your garden and crumbled feta drizzled with olive oil and balsamic? Yes, my imagination is running away with me . . .and I am also getting hungry again! So, go! Make some fresh polenta and enjoy! Easy Homemade Polenta 1 Cup Corn Meal 3 Cups water 1 tsp salt Bring the water and salt to a boil, reduce heat to medium low and slowly pour in the corn meal. Stir well to combine, then reduce heat to low and allow to simmer for 20 minutes. Place the polenta in a dish or pan, press down firmly to shape it, and allow to cool. About 10 minutes. Slice and fry in hot pan that has just a small amount of olive oil. Serve. I find that the key to this recipe is to stir regularly through the 20 minutes so that the polenta does not burn to the bottom of the pot AND to start with a tall sided pot with as small a bottom as possible. I have a 2-3 qt saucepan that has high sides and works perfectly. The reason why you want the tall sides is because the polenta spits and pops as it cooks the water into the cornmeal. You also need to make sure that you cook it for the full length of time. It will be thick. Then scoop into a greased pan or dish. I used two small non-stick loaf pans and parchment paper for easy removal so that I could slice it before frying. Once in the pan of choice, press down firmly so that it sticks together well. Allow to cool and slice then fry. Enjoy! NOTE: I whipped ours up with onion powder, lots of garlic powder, and black pepper, too. Maybe you like yours with a buttery flavor. You could add a little olive oil or butter to the mix right after you add the cornmeal to the water. Or other herbs and spices, depending on what you are serving it with! 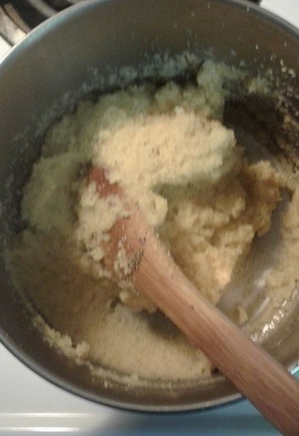 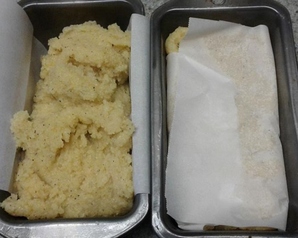  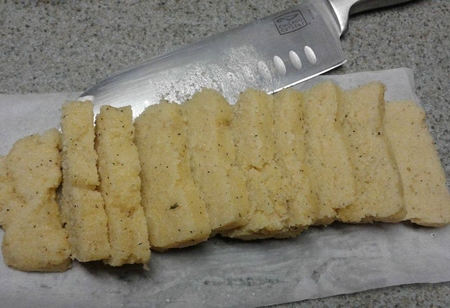 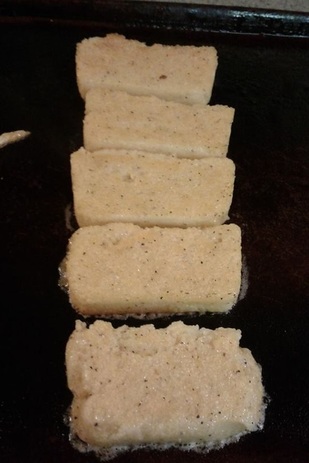 I was in a mood the other night. I was tired of the same-old-same-old and was very much in the mood for something for dinner that was easy, but filled with vegetables. And it was chilly outside. Going through our food storage, I figured a nice pot of vegetable soup would fit the bill. I started re-hydrating things, and before I knew it, we had dinner!
It sort of created itself as I went along. My original intention was to have a more broth-like soup, but the idea struck me to turn the potatoes into the creamy broth. I hope that you enjoy this one as much as we did. It was hot, packed full of veggies, and very filling. I have added a few ideas for variations on the recipe, in case you would like to try something different. Maybe one day you can have it as made, but the second day, turn the leftovers into a cheesey soup for dinner! CREAMY VEGETABLE SOUP SERVINGS 4 1/3 Cup Freeze dried Celery 2 Cups Freeze Dried Potato Dices 6 Cups Water 2 Tbsp Vegetarian Chicken bullion Place water in a soup pot, add the bullion, mix well, and bring to a boil. Add the celery and potatoes, reduce heat and simmer a few minutes. Then turn heat off and allow to sit. 1/3 Cup Freeze Dried Onions plus 2 Tbsp water in a small bowl, set aside. 2 Tbsp olive oil Garlic powder to taste 2-16 oz bags of California Mix (Broccoli, Cauliflower and Carrots) 1/2-3/4 Cup water In large saucepan, heat olive oil. Add the rehydrated onions and Garlic powder to taste. Sautee until onions appear clear, then add frozen vegetables and water. Bring water to a boil. Steam the vegetables with the lid on to conserve liquid. When soft and tender, using a potato masher, mash the vegetables slightly so that they are in smaller, bite sized pieces for soup. Set aside. 4 Tbsp Freeze Dried Sour Cream 5 Tbsp Freeze Dried Milk Powder 1 1/2 Cups water Shake well in a jar and set aside. Return to the Potato mix in the soup pot and with your hand blender, blend this mix until smooth. You may leave some chunks if desired. Once ready, scrape the onion/vegetable mix into the soup pot, mix well, and turn the heat to medium/medium high, depending on your stove, to bring it to a light boil without scorching the potato broth. Reduce heat to simmer and allow the flavors to blend for a few minutes. Pour in the milk mixture and heat through. Serve hot with fresh bread, or crackers. NOTE: You may use Freeze Dried Carrots, Broccoli, Cauliflower, but I find for this recipe the frozen do work best. Fresh would be great, too. VARIETY: You can add meat to this if you are looking for a higher protein meal. Just remember to rehydrate it before adding to the soup, then heat through. Other vegetables may also be added, such as corn, peas, or peppers. Maybe even some turnips fresh from your garden. Start with this as a soup base, and use your imagination. Cheese? Rice? This recipe may seem involved, but is actually quick to prepare - just like most dishes we serve here at home now with our THRIVE Freeze dried foods. It's great served with some hot rolls, a big salad from your survival garden, OR with a batch of Gluten Free Naan breads.
Curried Chicken Over Brown Rice 1 Cup Instant Brown Rice plus 2 Cups water 1 tsp Chicken Bouillon Add bouillon to the water in a pot. Bring to a boil, add THRIVE Instant Brown Rice, bring to a boil, reduce heat and simmer, covered, for about 8 minutes. Turn off heat and allow rice to sit while you cook the Curry. 1/2 Cup Freeze Dried Chopped Onion plus 3 Tbsp water 1 1/2 Tbsp EVOO 2 1/2 tsp Curry Powder 1/4 tsp cayenne 1/2 tsp salt 1/4 tsp black pepper 1/2 Cup Plain Yogurt or Kefir (I have also been known to use 1/2 Cup Sour Cream powder pre-mixed with water in a pinch. It works just as well.) 5 Tbsp Powder Milk and 3/4 Cup water (or 3/4 Cup half and half ) 2 Cups Freeze Dried Diced Tomatoes and 1 Cup water (or1-14.5 Ounce can diced tomatoes) 1 1/2 Cup Freeze Dried Chopped Chicken plus 3/4 Cup water 1/4 Cup fresh cilantro, chopped Place EVOO in a skillet and heat on medium heat. Add the rehydrated FD Chopped onions. Saute lightly. Add the other spices and stir thoroughly. Remove from heat. Add yogurt and stir thoroughly, careful not to allow it to curdle. Gently add the milk and stir. Add the Diced tomatoes and chicken and heat through. Serve over the cooked rice and sprinkle with chopped fresh cilantro. We love crackers with soup, hummus, or just to have around for nashing with some cheeses. Gluten Free crackers can sometimes be expensive and I love baking so why not try to create a recipe that can easily be made at home? I had a recipe for an almond cracker that we sometimes like, but after a while the flavor of the almonds gets to be mundane and you would like a change.
Using my old recipe, I tried to measure out the right replacement for the THRIVE Gluten Free flour and the first batch created a very dry dough that I kept adding water to until it felt about right, soft and rollable but not sticky. It wasn’t too bad once I found the right texture, but when they baked up they were HARD. Almost too hard to break. I recalled my first year of eating gluten free and remembered that many flours need to be exchanged by WEIGHT, not by measuring cup. So I weighed out the almond flour, and it weighed in at 8 ounces. I don’t recall exactly how much almond meal it was by cups, but 8 ounces would work. Trying the recipe again, using 8 ounces of Thrive GF Flour, the crackers turned out perfectly. Now that I make these at least once a week, I am honestly tired of rolling them out with a rolling pin. It can be a challenge to get it just the right thickness every time. One morning I had a brilliant idea - why not use my pasta machine! I dug it out of the cupboard and after mixing the dough, within just a few minutes, I had all the dough rolled out into almost the same sized strips with uniform thickness! You may find that you need to sprinkle a little bit of Rice flour as you press the dough through the pasta machine, but I did not have to and it went through perfectly, without sticking anywhere. Then I was able to cut each strip down the middle, and cut those strips into bite sized crackers, bake as usual! Now I am trying to figure out what else I can use that pasta machine for with my Gluten Free Flour! Now go bake some crackers and make a pot of soup, then enjoy! Gluten Free Crackers 8 oz Gluten Free Flour (WEIGHED not measured in cups) 1 tsp Himalayan Pink Sea Salt 4-6 oz filtered water 1/4 tsp baking powder, optional, makes a slightly lighter cracker Salt, dried garlic (finely chopped), dried onion (finely chopped), or other toppings if desired. IMPORTANT NOTE FOR THIS RECIPE: This recipe was created to use THRIVE GF Flour mix, but can be used with other GF Flours as well. The key for this one is that it is NOT a “Cups" recipe, and needs to have the flour measured out in ounces. Many GF flours are different by weight, so this is very important for the right consistency dough. Preheat oven to 400. Mix all dry ingredients well. Place a well in the middle of the dry ingredients and gently pour in about 4 ounces of the water, setting aside the rest in case it is needed. Mix all ingredients together with a fork until forms a nice ball. The dough needs to be soft, but NOT sticky. If it is too dry, add a little more water, 1Tbsp at a time and mix well. Knead gently for just a minute or two. Cut dough in half. On parchment, roll out one half very thin. Then do the same with the other half. With a fork, poke holes in the dough to allow steam to escape while cooking. Cut to desired size using pizza cutter. I usually cut to individual cracker sizes, like snack crackers. Bake for 5-15 minutes, depending on size you cut the crackers into. Watch them carefully and if they need more cooking time, only add 2-3 minutes at a time so that they do not over-cook or burn. These can go from almost done to burnt in just a short period of time. So PLEASE remember to keep an eye on them, don't get distracted - because the over done ones taste nasty! Depending on your humidity outside and inside they can last for up to a month. Store in an airtight container or jar. Serve with your favorite dip, soup, salsa, cheese, or hummus. VARIATIONS: Add 1-2 tsp rosemary to the crackers for a taste treat. You can also add other herbs or spices to go with the dip, cheese, or soup you will be serving these with, or Parmesan cheese to the dry ingredients, before adding water. With dry herbs or Parmesan, you may need to add a bit more water to make it roll-able. Herb suggestions: Dill, onion, garlic, chive, chili powder, Thyme. Need Something to Serve with Soups or Curry? Gluten Free Naan Bread Makes a Great Addition10/23/2016
We love naan bread served with curried foods, and with just about any kind of stew like dish. It just makes such a wonderfully light bread addition to any meal. This recipe isn't quite like the ones made in restaurants, but it is a nice substitute. These can go with so many different dishes by just switching out your spices and herbs. Play with it - have fun! Create something wonderful and share your flavor taste treats with us in the comments.
Gluten Free Naan Bread 1 Tbsp ground Chia seeds +1 Tbsp water, place in a bowl & sit a minute 1 Cup Gluten Free Flour 1 Cup Organic Whole Milk (Or 1 Cup water & 4-5 Tbsp THRIVE Powdered Milk)Salt to taste Spices: Fresh or dried dill, curry powder, onion powder, garlic powder Mix together all ingredients. Batter should be somewhat runny so that when you place it on the griddle it flows evenly. Heat an electric griddle to 350 degrees F. Pour about 1/3 cup batter onto hot griddle, spread thin with a spatula, keeping in a circle shape as best as possible. Allow to cook first side until top is no longer wet and flowing, without burning bottom. Flip and cook the second side just until done. Remove from griddle and continue until all batter is used up. Stack naan breads in a circular pattern on the serving plate to keep them warm and to make ready for serving. Serve with Curried chicken, humus, baba ganoush, or any of your favorite fillings. Also delicious spiced with southwestern spices and served as a soft taco shell or wrap. You can also vary the gluten free in gredients a bit for a slightly different flavor. Here are two alternate recipes that I have used with success - the one with coconut flour has a distinct coconut flavor and may not go with all main dish meals. Alternate Recipe 1 1 Tbsp ground Chia seeds + 1 Tbsp water, place these in bowl & sit a minute 1/2 Cup Almond Flour 1/2 Cup Gluten Free Flour 1 Cup Organic Coconut Milk (Or 1 Cup Organic whole milk, or 1 Cup water & 4-5 Tbsp Powdered milk, for creamier texture) Salt and herbs to taste Alternate Recipe 2 1 Tbsp ground Chia seeds plus 1 Tbsp water, place in bowl & sit a minute 1 Cup Almond Flour 1/8 Cup Gluten Free Flour 3 Tbsp Coconut Flour 3 eggs 1 1/2 Cups whole milk Salt and herbs to taste There is a story behind this dessert - in a pinch, I needed a quick and delicious recipe to serve for a holiday dinner, but had not yet used my Freeze Dried Granny Smith Apples for an apple crisp. I pulled out my "Old-faithful" recipe and realized I have changed since I made that one last - I don't eat much sugar or sweetener any more. And when I do make desserts, I really do prefer them to be less sweet than what others will like. I wanted a wonderful flavor, but a dessert that is a little bit better for you than a traditional apple crisp. By comparison, my original recipe used a whopping 3/4 cup of sugar and only 1/2 cup of oats!!! So I jumped in, threw things into the bowl and, because I have finally learned to keep pen and paper handy when creating, I wrote down each ingredient as I measured. For us, this one had just the right amount of sweet which left the Apple crisp with a great sweet-tart flavor with the crumble topping and the Freeze Dried Granny Smith apples. You could add more sugar if you like things that way, but try it once this way first and see what you think! Gluten Free, Lower Sugar Apple Crisp 4 Servings (Can be doubled and baked in a larger dish for more servings) 4 Cups Freeze Dried Granny Smith Apple Slices Enough water to rehydrate to a soft, but not squishy, apple slice. Baking will dry them out a bit so you want to add just a little more (approx 1-2 Tbsp) than is called for on the can. Pour the water over the apples in a plastic dish, place lid on top tightly and set aside. Gently shake every now and then to evenly rehydrate. In a separate bowl, Mix together: 1 Cup Quick Oats 2 Tbsp Ground Flax Seed 1 Tbsp Ground Chia Seeds 3 Tbsp butter, SOFT, not melted! 1 tsp Cinnamon heaping 1/8 Cup Brown sugar (I also added 1/2 Tbsp molasses for a more intense flavor) 1/2 Cup chopped walnuts or pecans Butter a small baking dish (about 8 inch round) and place your rehydrated apples evenly across the bottom of the pan. If you like a thicker apple layer, you can add additional rehydrated apples. Gently sprinkle the crumble mixture on top of the apples, trying to spread evenly and covering the apples as much as possble so they do not brown in baking. Place in a preheated 350 degree oven for 20 minutes. Remove from oven, allow to cool. Serve room temperature with some whipped cream, ice cream, caramel sauce, or just plain! Goes great with a cup of hot coffee or a mug of hot tea. When I was little, my mom used to make a tuna salad with onions, celery, mayonnaise, peas, and just a couple of chopped hard boiled eggs. Oh, and tuna of course. Every one of my friends thought it was weird, and it seemed like we were the only family in the whole neighborhood that put peas in their tuna salad. BOY! Did I love that recipe, though. It was great on a hot summer day with lettuce, tomato, sliced onions on a nice wheat or rye bread. I still remember how good it tasted! In recent years, what with mercury contaminations and radiation worries, we have gotten away from eating tuna fish, but every now and then I still would love a tuna sandwich. One day I got the bright idea to try mom’s old recipe, but with THRIVE Feeze Dried Chicken. WOW! Was I surprised! I made my homemade mayonnaise recipe, rehydrated all the appropriate vegetables and the freeze dried chicken, diced some fresh onions because I had them on hand, tossed it all together in a bowl, mixed it well and chilled it for several hours. We served it on gluten-free bread made on Gluten Free Flour, with fresh lettuce, tomatoes and sliced onions as well as some pickled hot banana peppers and YUM! Was it perfect. It doesn’t taste exaclty like mom’s because, let’s face it, there will always be a taste difference between fish and chicken - no fish taste with chicken. But next time I am craving mom’s old fashioned tuna salad with peas, I know I can whip up this recipe and feel like a kid again. Easy Chicken Salad Servings 4-6 3/4 - 1 Cup of Freeze Dried Chicken 1/3 Cup Freeze Dried Celery 1/2 Cup Freeze dried Peas 1/2 Cup Freeze Dried Green Onions 1/2 Cup Freeze Dried Chopped onions or fresh onion chopped 1 Cup Water (An extra 1/2 Cup may be needed for best rehydration depending on preference) Place all these ingredients into a large bowl, and mix well. Cover and let sit for 15-20 minutes to fully rehydrate. 2-4 hard boiled eggs, peeled and chilled, then chopped Sprinkle of Onion powder, Garlic powder, Black pepper, and salt to taste 3/4 Cup Mayonnaise (I use our recipe for Homemade mayo!) Drain off any excess water from the meat and vegetables, if there is any. Shake the colander thoroughly so that your finished salad won’t end up runny. Place back into your large bowl, add the mayonnaise and mix thoroughly. May be served right away, but is always best chilled 1-2 hours or over night. Great served with sliced tomato, sliced onion, sliced pickled hot pepper rings, on homemade bread! Wrap it in lettuce or scoop with chips, or enjoy in a wrap!!! This salad will be perfect no matter how you serve it. ENJOY! Gluten Free Crockpot Chicken and Dumplings Serves 6-8 people depending on apetite Filling 1/3 Cup butter 1/2 to 3/4 Cup Freeze Dried onions + 1/3 +/- Water, in a small bowl 1/4 Cup Gluten Free Flour 1/4 tsp Black Pepper 2 Cups water to which has been added 1-2 tsp of Chicken Bouillon (To taste) 3 Tbsp Powdered Milk + 1 Cup water 1 1/2 Cups Freeze Dried Chicken Chunks + 3/4 Cup Water, in a medium bowl 1 Cup Freeze Dried Corn + 1/3 Cup HOT Water 1 Cup Freeze Dried Peas + 1/3 Cup HOT water 1/4 Cup Freeze Dried Carrots + 1/4 Cup HOT water 1/2 Cup Freeze Dried Celery + 4 Tbsp Water 1 Cup Freeze Dried Potato Chunks + 1 Cup Water (Optional) Turn your crockpot onto warm just to prewarm the dish. In a large sauce pan, melt the butter, then add the onions and cook till onions are “clear”, to bring out their flavor. Remove from heat. Add 1/3 Cup GF Flour and black pepper, stir to mix well. May be a little dry, but try to mix in all the flour with the butter. Then add the water with the bouillon already dissolved. Mix well. Bring to a boil and allow to thicken. You don’t want this as thick as pot pie filling because it will be cooking for a time in the crockpot. It should be more stew consistency. When thickened, add milk mixture and stir through, then remove from heat and add re-hydrated vegetables and chicken. Gently pour mixture into the pre-warmed crockpot, then turn the heat to high. While it continues to heat up, mix the dumplings. Dumplings 1 1/2 Cups Gluten Free Flour 1 Tbsp Baking Powder 1 tsp Chicken Bouillon 1 Tbsp ground chia seeds with 2 Tbsp water added 1/4 - 1/2 tsp black pepper 1 Cup Whole milk (or 4 Tbsp Powdered milk plus 1 Cup water) 3 Tbsp butter Herbs for flavor: Optional, Some like to add 2 tsp Thyme leaves for added flavor In bowl, whisk together dry ingredients. Gently heat the milk until heated through, add butter. Turn off heat and allow butter to melt into milk. Mix into dry ingredients until just incorporated. Drop dough by spoonfuls onto hot filling in crockpot, leaving a small space between each dumpling to allow for rising. Cover and continue to cook on high until dumplings are cooked through, 45-60 minutes. Serve Hot. Makes about 6-8 servings depending on appetite. 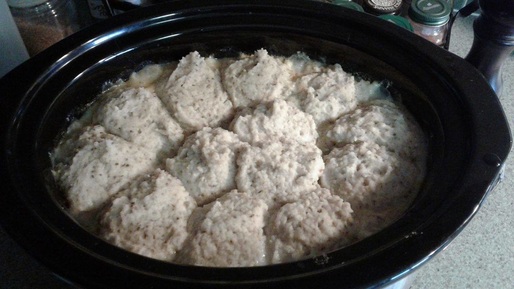 This picture was taken about midway through the cooking of the dumplings and, as you can see, they have expanded to fill the 1/4 inch space I had left between them. Now they will continue to rise and be lighter and fluffier as they expand. We had one of those odd hot autumn days a couple weeks ago. The kind that reminds you suddenly of summer, and the temperature made us feel that we just weren't in the mood to heat up the kitchen with a hot meal being cooked. So early in the day, I decided to make something a little different. I grabbed different cans from the pantry and stared at them for a bit until it hit me - chicken salad. Easy quick to mix and let sit until evening. I wanted something a little different in flavor, though, and then I saw the Freeze Dried Chili Peppers, Freeze Dried Corn, and that bag of corn chips from the cupboard. That's when I got the idea to throw together a Mexican Spiced Chicken Salad and serve it with corn chips and pickled jalapenos. This one was easy to make and makes a great meal that can be mixed ahead, set all day to meld, and be pulled out when you are ready to sit down to the table. Served with corn chips, potato chips, or even in wraps, this would also be great for nights when you need to eat in a hurry. Quick and Easy Mexican Chicken Salad Servings 4-6 3/4 - 1 Cup of Freeze Dried Chicken 1/2 Cup Freeze Dried Sweet Corn 1/2 Cup Freeze Dried Chili Peppers 1/2 Cup Freeze Dried Green Onions 1/2 Cup Freeze Dried Chopped onions or fresh onion chopped 1 Cup Water (An extra 1/2 Cup may be needed for best rehydration depending on preference) Place all these ingredients into a large bowl, and mix well. Cover and let sit for 15-20 minutes to fully rehydrate. While the meat and veggies are rehydrating, mix together: 2 Tbsp Tomato Powder 2 Tbsp Dry Cilantro, or 1/4 Cup fresh chopped 1 Tbsp Chili Powder Sprinkle of Onion powder, Garlic powder, Black pepper, and salt to taste 3/4 Cup Mayonnaise (I use our recipe for Homemade mayo!) Make sure to mix thoroughly. Drain off any excess water from the meat and vegetables, if there is any. Shake the colander thoroughly so that your finished salad won’t end up watery. Place back into your large bowl, add the mayonnaise mixture and mix thoroughly. May be served right away, but is always best chilled 1-2 hours or over night. Serve with salsa, fresh diced tomatoes, chopped onions, salsa, sour cream, guacamole, or sliced avocados. Wrap it in lettuce or scoop with corn chips, eat in taco shells, or enjoy in a wrap!!! This salad will be perfect no matter how you serve it. ENJOY! 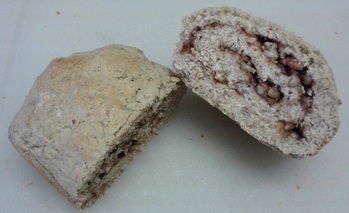 One thing I miss after going gluten free is a good cinnamon bread - the kind you get in a bakery with the cinnamon sugar swirl running through it. I prefer to make as many of our foods at home as possible - that way we know exactly what went into it from beginning to end. I could probably buy a gluten free cinnamon raisin bread from a grocery, but often times there are ingredients in there that we try to avoid in our foods for various reasons. That being said, one day I mentioned to a friend that it would be nice to create a recipe for a cinnamon swirl bread. I decided to use our gluten free dinner roll recipe and see how it worked. Although it rose quite a bit (definitely doubled in size), as it cooked, it fell quite a bit and was a bit more solid and a lot less light and fluffy than I had hoped. BUT - it was GOOD! The flavor was wonderful and it only lasted until the next morning! Was it like what you would get as a "normal" loaf of cinnamon swirl bread? No. To be honest, it wasn't really close. Instead, it had it's own distinct texture and flavor and was a unique pastry all its own. Mix up one batch of Gluten Free Dinner Rolls dough. Prepare a loaf pan by oiling or buttering the inside and lining with parchment paper. Sprinkle a sheet of parchment liberally with Gluten Free Flour. With wet hands, shape the dough into a rectangle. You may also try to roll it between two sheets or parchment, but I find it easier to spread with my hands. When it is about 1/2 inch thick, sprinkle with cinnamon and sugar mix, then nuts. Roll up gently, and place in your pan. Allow to rise and bake until done! Allow to cool for a bit, then serve warm, or allow to cool fully and serve room temperature. ENJOY! (More detailed instructions are available in the captions of the photos) 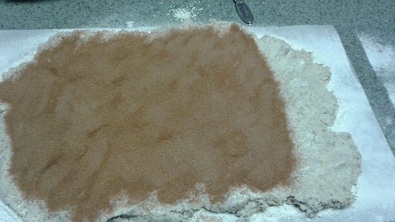 After pressing into a rectangle shape approx 1/2 inch thick or rolling out the dough between two sheets of parchment, sprinkle all but the last couple of inches with a cinnamon and sugar mix. I used 1 Tbsp Cinnamon, and about 1/2 cup of sugar. We prefer things less sweet, while you may wish it more sweet.  After sprinkling with cinnamon and sugar mix, sprinkle with chopped nuts of your choice. 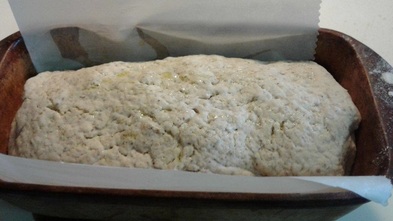 This was the hard part because some spots stuck to the paper in spite of all the flour sprinkled on it. Starting at the cinnamon end, roll carefully, and make sure to pinch the edges and ends tightly. Carefully place in your prepared pan. Allow to rise 1-2 hours, until doubled. Bake in a 400 degree oven for 30-40 minutes. Being careful not to allow it to over cook. Brush with melted butter and allow to cool. Slice and serve. 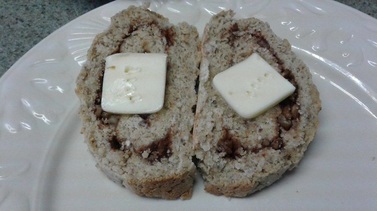 I enjoy having this recipe around in a jar for whenever I am in the mood for something different. It is easy to make with products from your food storage, and keeps for a month or two if it lasts that long. It is even better for you and the kids than those sugary cereals you could be buying at the grocery store.
Granola is great with milk in the mornings, sprinkled over fresh fruits like berries, melons, or even sliced apples. How about serving it over a bowl of ice cream or your favorite frozen yogurt? Mix it in with your kefer or yogurt for a hearty afternoon snack or filling balanced breakfast. It is even a quick and easy crunchy snack to just grab and nash. One of the reasons I enjoy this recipe is because it is versatile, can be changed by adding different nuts or dried fruits and is packed full of nutritious seeds and grains. Also, uses your favorite honey rather than sugar for sweetening. Do you want a slightly stronger flavor? Add a little bit of molasses along with the honey for a darker, richer taste. No matter how you mix it up, it is still tasty, filling, and packed full of goodness. Higher Protein Gluten Free Granola 1 Cup Quinoa 1 Cup Quick Cook Oats 1/4 Cup ground flax 1/4 Cup ground Chia seeds 1/2 Cup Shredded Coconut 1/2 Cup Peanut Flour 3/4 Cup Honey, melted 1 Tbsp Oil Preheat oven to 300 degrees. Put quinoa on a cookie sheet with sides. Place in preheated oven and roast for about 7 minutes. Remove and pour into bowl. Add the rest of the dry ingredients. Mix well until coated with Peanut Flour. Drizzle honey over the mixture then drizzle oil over. Mix well until thoroughly coated. Lightly oil the same cookie sheet used before, and spread granola mix in a thin layer on the cookie sheet. Place in the oven and cook for about 15 minutes. Remove, stir, bringing the sides into the middle and mixing well. Place back in oven for 10 minutes, checking occasionally to ensure it is not burning. Remove from oven and allow to cool thoroughly before placing in an airtight container or bag. Served as a topping over ice cream or fresh fruit, or as cereal in the morning with cold milk. Granola can also be eaten as a snack or packed for travel. Granola can be easily varied by adding different spices, flavorings like almond or maple, and adding dried fruits and nuts. It is a versatile recipe to add to your storage portfolio and can be whipped up in no time at all. Recipe is also easily doubled, but may need an additional pan to be baked in to make sure you spread it thinly and evenly for even baking.  Around this time of year, squash and pumpkins are everywhere. This is great time to grab a bunch and put up some pumpkin or squash puree in the freezer or canning cupboard for use over the winter season. And, what better treat to serve while you enjoy the fresh smell of chilly Autumn air than a tasty slice of pumpkin bread? Well, I guess you could eat those wonderful fudge brownies I posted earlier, but if you aren't a big chocolate fan or aren't in the mood for those, our gluten free pumpkin breads are another great choice! These loaves can easily be frozen, too, for later - if they last that long! This recipe is extra special as it is made without eggs. Great for your home storage cookbook or recipe box. For those looking for a dairy free recipe, this one's not it. It does work better with milk for some reason than with almond or other nut milk. You are welcome to try it that way, if you like, and let me know what your results were! Would love to hear. Gluten Free, Egg Free Pumpkin Bread 2 Loaves 3 1/2 Cups Gluten Free Flour 2 Cups Sugar ( I used 1 1/2 Cups) 2 tsp Baking soda 1 tsp salt 2 tsp Pumpkin Pie Spice 1-16 oz can of Pumpkin Puree (Organic comes in 15 ounce can. I used this plus 1/4 Cup extra milk) 1 Cup Olive Oil 2/3 Cup milk 1 tsp Vinegar Preheat oven to 350 F degrees; oil 2-9X5 loaf pans. I also like to line my pans with parchment paper for easy removal of loaves. If using non-stick pans, no need to oil them. Mix all dry ingredients together well. In a separate bowl, mix all the wet ingredients. Pour the wet into the dry and mix together just till well combined. Do not over beat. Separate the batter evenly between the two pans and place in the oven for 45-50 minutes until a toothpick inserted in the center comes out clean. Cool in the pan 30 minutes, then remove and cool on a wire rack. Place in a bag or container for storage. Delicious with a slab of cinnamon butter slathered all over it, or a little dollop of cinnamon sour cream made with some milk or water and Sour Cream Powder. I love food storage. I love chocolate. And I love autumn. Now let's put the three together and make something delicious to enjoy with a nice hot cup of tea or coffee on a chilly day. I have to be honest right from the start, this recipe is only about 60% home storage products (Cacao, Sugar, Vanilla, Gluten Free Flour) because there is nothing better than using real butter and fresh eggs in a fudgy brownie recipe, and it is one of my absolute favorites. I love this recipe because it is gluten free, quick, AND delicious!
Gluten Free Fudge Brownies 16 Brownies 1/2 Cup plus 2 Tbsp Butter, melted 6 Tbsp Cacao powder (preferred over cocoa, but cocoa can be substituted) 1 Cup Sugar 2 Eggs 1 tsp vanilla 1/2 Cup Gluten Free Flour Pour Melted butter into mixing bowl, add cacao and mix well. Mix in sugar and vanilla. Add flour and then 2 eggs and gently mix until combined. Spread in a buttered 9X9 square baking dish. Bake in 350 degree F oven for 20+/- minutes until just done, but still soft and fudgy. Allow to cool and cut into 16 squares. Enjoy! NOTE: I have made this recipe using olive oil instead of melted butter. I cut back the fat to just the 1/2 Cup and mix. It is a bit thicker to spread, but is not as greasy when baked as if you used the full 1/2 cup plus 2 Tbsp of oil. You can also substitute the full amount of fat with coconut oil, if you would prefer. But this will impart a distinct coconut flavor - which is not a bad thing! I also have cut the sugar back to just around 2/3 cup to reduce the sweet and make a more bitter-sweet or darker brownie. This can also be done in conjunction with the oil instead of butter. Although these substitutions work well, I do find that there is nothing like genuine eggs. I have used powdered, but it produces a slightly more cake-like brownie over fudge brownie. |
Prepping Expert
AuthorJudith has over 30 years experience in food storage, herbs, essential oils, and prepping. She was a captain in the USAF-AUX, FEMA trained, Community Emergency Response Team member and NRA marksmanship award recipient. She shares her experiences with her readers offering tips and recipes. Disclosure
The information shared is our personal opinion and should NEVER be considered a substitute for professional medical, nutritional, or other expert advice. Information contained is not for the purposes of diagnosing, or treating any disease or medical condition. Any endorsement of products should not be considered an un-biased review since we are paid and compensated when you purchase products from this site.
Archives
March 2024
Categories
All
|
 RSS Feed