 One of the items a lot of families store in their home storage for bulk and nutrition is dried beans. Beans are a great source for protein, fiber, and several other minerals and nutrients that your body needs just to get by from day to day. A nutrient-dense whole food, dried beans are great for long term as well, because they can be packed away for years and years. Some people aren't up for storing too many beans, though, as they tend to produce a lot of intestinal gas that can make home storage, shall we say, uncomfortable.
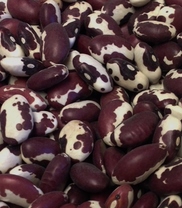
One of our favorite beans to keep in our home store are the pretty burgundy and white Anasazi beans. These beans have also been called Cave Beans or Appaloosa Beans, and have been identified as a “cousin” of the pinto bean. The Anasazi Beans, though, can help a bit with the intestinal disturbance mentioned previously, because they tend to have less of the gas producing ingredients than typical beans kept in food storage. In some claims, there is as much as an 80% reduction in the amount of gas producing irritant in the Anasazi beans. My favorite reason for keeping them, though, is actually because they take a lot less prep time and a lot less water than standard beans like pinto, kidney, black, and white beans do. Anasazi beans take between 30 and 60 minutes to cook tender for use in any recipe that usually calls for canned or cooked beans. We have used them in our kitchen to make everything from refried beans to Chili, and from casseroles to baked beans. Although they are a bit bigger than the standard white bean or navy bean used to make baked beans, the flavor in the recipe was just as good as if I had used Navy beans. Making the Anasazi bean the most versatile bean in our storage and kitchen. Another great benefit of Anasazi beans are that they are an heirloom variety of beans which can be planted in your vegetable garden and grown for additional food for the future. Although legend has it that archaeologists discovered ancient beans, hundreds of years old and sprouted some, which allowed the ancient bean to be rediscovered, it is unlikely that this is their true history. It is more likely that they have been grown and preserved over centuries then regrown. Even “seed viability specialists” are known to have stated that it is likely that seeds of this type cannot be stored for growth for more than 50 years as that seems to be the “outside edge” for growing seeds that have been stored. This is good encouragement, though, for someone to grow their own vegetable garden because you can easily reproduce your crop year after year as well as set up some for future food storage. This is a great rotating crop for extending your food storage for years to come. If you are looking for a great addition to your dry bean storage, grab some Anasazi beans and give them a try. Leave a comment below and let us know what you think of their flexibility, flavor, and versatility. Enjoy!!! Have you been looking for a simple yet tasty recipe for gluten free dinner rolls that your family will enjoy? We have a recipe for you that uses just 8 simple ingredients, and the end result is a delicious roll that is perfect with soups, salads, and pasta dishes. This recipe can be whipped up and left to rise in just a few minutes, then risen and baked golden brown, brushed with butter and served hot in just about an hour and a half. We have served them brushed with plain melted butter and even with fresh pressed garlic and melted butter, for a nice hot garlic roll. Italian spices added into the dry ingredients would spice them up a bit to go with the evenings Spaghetti and meatballs, or some Southwestern spices to go with a hot and spicy casserole. Let your imagination run away with them and enjoy! GLUTEN FREE Dinner Rolls 4 Servings 1 Cup warm water (approx 100-110 degrees) 1/4 Cup Sugar 2 tsp Instant Yeast 2 1/2 Cups Gluten Free Flour 1 Tbsp Chia Seeds, ground (may also use 1 1/2 tsp xanthan gum) 1 tsp Salt 1 egg, room temperature 2 Tbsp butter, melted Mix together the warm water and 2 Tbsp. of the sugar. Add the yeast and allow to sit while you mix together the dry ingredients. Place the dry ingredients, including the balance of the sugar, in the mixing bowl. Mix thoroughly. With mixer on low speed, pour in water, sugar, yeast mixture, then add egg, and melted butter. Mix on medium speed for 3 minutes. Mixture should be slightly gooey, but not too sticky. Add a small amount more of flour if needed. Grease an 8 or 9 inch round baking pan. Scoop 8-9 mounds into the pan to look like a pan of dinner rolls. (Hint: Scoop one into the middle and then 8 around the outside edges for even spacing). Dip fingertips into water and smooth out the tops. Cover with a dry towel and let rise in a warm place 45 - 60 minutes. During the last few minutes of rising time, preheat the oven to 400 degrees F. When oven is ready bake for 25-28 minutes until tops are golden brown. Brush finished rolls with additional melted butter and serve hot. Serving suggestion: Brush with melted olive oil or butter to which has been added crushed garlic or garlic powder for garlic rolls. Also great hot right out of the oven and dipped into herbed olive oil. 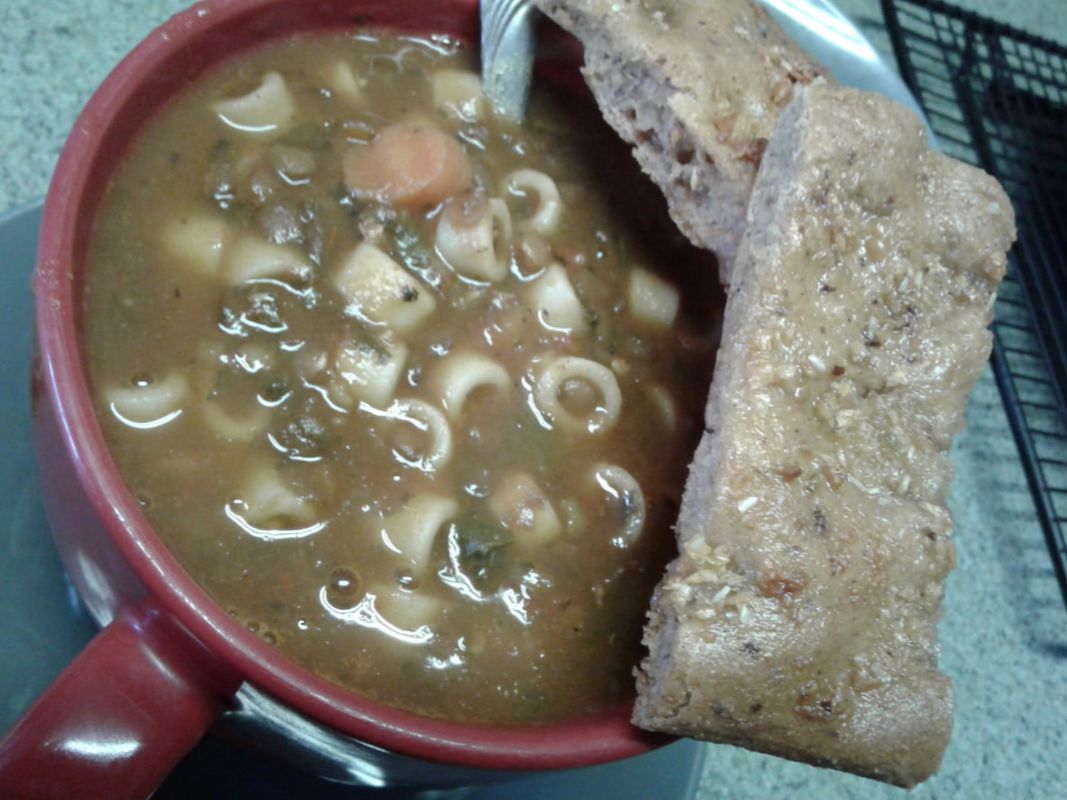 One way you can use this soup is as a type of Pasta Fajioi. YUM! With some Parmesan and fresh Focaccia. For a great flexible recipe, I love to toss together a big pot of Hearty Italian Lentil Soup. Why is it flexible? Because you can make this soup thick and hearty for those who like a more stew-like soup, or thinner for those who enjoy it a bit more brothy. Hearty Italian Lentil Soup also has such a rich Italian flavor that several people have commented that they would love to throw in some beans and pasta and make it more like a Pasta Fagioli. Another option? Imagine throwing in some frozen or even fresh Tortellini if you have them laying around. Or even a batch of Gnocchi, instead. Suddenly this recipe has so many more options available for including it in your 30, 45, or even 60 day menu plan. If you aren’t in a situation where freezer space is limited or unavailable, you can always make a double batch and toss some into the freezer in larger tubs for sharing with family or in single serving sizes for lunches work or quick meals in a pinch. Some even like to enjoy it as a late night snack. One of our favorites with the leftovers, after it has sat in the fridge for a day or two, and the lentils have helped it to thicken nicely, take the soup and pour it over some boneless chicken in the oven. Allow the chicken to cook through and top with cheese then serve. Delicious! Now you see why we call this one so flexible. It can be used in so many different ways that it’s one you will definitely want to print for your home storage cookbook. Hearty Italian Lentil Soup Prep and Cooking Time: 2-3 hours (most of this is simmering time, prep time is only about 20 minutes) Servings: 6-10, depending on serving size 1 Cup Chopped onion 1/3 Cup Carrot Dices 1 Cup Tomato Powder 1 Tbsp Chicken Bouillon 1 Cup Lentils 1 1/2 Cup Chopped Spinach Organic Spice Blend: 1 tsp. Dry Thyme 2 tsp. Dry Oregano 2 tsp. Dry Parsley 1 tsp. Dry Basil 1 Tbsp. Garlic Powder 2 tsp Onion Powder Black Pepper to taste Salt Optional - we eliminate the salt because of the salt in the bouillon) 1 to 1 1/2 Gallons Water 2 Tbsp Olive Oil Option one: Pour 1 gallon of water into the pot, add all dry ingredients to the pot, and stir well. Bring to a boil, then turn to simmer, allowing to simmer for 30-60 minutes, until lentils are cooked through. Stir soup occasionally during simmering and add more water if it looks as though vegetables and lentils have absorbed too much. The longer the lentils cook, the more tender they will be. Allow to sit for a while to blend flavors. Best served the next day to allow flavors to mingle, but can be served as soon as Lentils are tender. Option Two: Rehydrate onions with 1/3 C. water from the one gallon of water set aside. In a separate container, rehydrate carrot, spinach, and Tomato powder in about 2 cups of water from the gallon. When Onions are rehydrated, add a little olive oil to the pan and heat. Add onions and sauté for a few minutes. Add the rehydrated carrot, spinach, and tomato powder then add the balance of the water. Sprinkle in bouillon, spices, and lentils. Bring to a boil, then turn down to simmer for 30 minutes. Remove from heat and serve, or allow to set for a bit for flavors to blend more thoroughly. Option 3: Place olive oil in pan and lightly sautee the FD onions. Add the herbs and spices. Lightly sautee to allow flavors to blend. Add water, then bouillon, carrots, and tomato powder. Mix well, bring to a boil, reduce heat, and allow to simmer 30 minutes. Add lentils, and allow to continue to simmer for an additional 1 to 1.5 hours, testing the lentils for desired tenderness. When done, turn off heat and stir in spinach, gently. If necessary, reheat the soup to desired serving temperature. Serve hot with parmesan sprinkled on top.
Another great food storage recipe with flexibility is our Stormy Day Spicy Bean Soup - and spicy, by the way, is relative. Depending on who has their hands on the jar of cayenne pepper, this can be a mildly spicy meal or one really hot soup! And not because you left the burner on high!
In this one, again, we like to use our Anasazi beans to make it quicker to prep and cook up as well as to reduce the intestinal distress that sometimes comes with eating beans. Stormy Day Spicy Bean Soup is a good pot of soup to whip up to go with a fresh pan of corn bread or even to toss some tortilla chips on top for garnish. It is delicious served with or without fresh cilantro, but I have to say I enjoy it more with the fresh herb sprinkled on top. And of course, a hot soup like this always likes to be dressed with some THRIVE Shredded Cheese Sprinkled on top. Stormy Day Spicy Bean Soup 1 C. freeze dried Chopped Onion, in a small bowl 1 C. Freeze Dried Green Bell pepper, in a separate small bowl 1-2 Tbsp freeze dried Chili Peppers, in bowl with freeze dried Green Bell Peppers 1 C. freeze dried Sweet Corn, in a separate small bowl 2 Tbsp Olive Oil ¾ C. Tomato Powder 8 tsp. Vegetarian Bouillon (either the "beef" or "chicken" styles will work well) 2 C. Freeze Dried Black Beans, prepared according to package directions (we prefer Anasazi Beans for their quick cooking time and great taste) 9 C. Water, measured and ready for use Spices: 3 Cloves Garlic 1-2 tsp. chili powder 1 Tbsp Oregano 1 tsp Cumin Black pepper to taste Cayenne Pepper to taste Garnishes: Lime juice or fresh limes for flavor and garnish Fresh Cilantro for garnish, if available Freeze dried Shredded Cheddar or Freeze dried Shredded Monterey Jack Cheese, rehydrated Instructions: With the vegetables each set aside in their own small bowls, add 1/3 C water to each bowl from the 9 C. measured out. Allow the vegetables approx. 5 minutes to rehydrate. Place 2 Tbsp olive oil in pot, turn heat to medium high, and add rehydrated onions and peppers. Sautee briefly, then add the rest of the 9 cups of water, the corn, tomato powder, bouillon, and prepared beans, stir to mix well. Add the spices and simmer for one hour to allow flavors to mingle. Serve hot with tortilla chips or corn bread. Garnish soup with shredded cheese and a slice of lime, if available, or a drizzle of lime juice from storage, and a sprig of fresh cilantro. If you have already made a batch of the Enchilada Sauce, this next recipe is perfect for using that Sauce to make a hot meal for your family. Cheesy Quinoa Enchilada Bake is packed full of great things your body needs to keep you going and your family growing strong! It is a generous dish filled with flavor and seasoning to satisfy that craving for something different from your home storage meals.
In this recipe, we like to use Organic Anasazi beans which we pick up from our local market or can order online in larger bulk packaging. These are great beans for home storage as they are lower in the ingredients that can irritate digestion, which can, in turn, lead to a more peaceful home. Cheesy Quinoa Enchilada Bake 4-6 Servings (Possibly 8 servings depending on sides and garnish) You will need: 1 Batch of our Easy Enchilada Sauce 1 Cup cooked beans (or 1 Can of beans drained - Pinto, Black or Anasazi) 3/4 Cup Quinoa with 1 1/4 Cup water and 1 1/2 tsp vegetarian Chicken Bouillon mixed in then cooked according to package directions 1 1/2 Cups Freeze dried Corn, rehydrated with 3/4 Cup water 1 Cup Freeze dried Chopped Chicken, rehydrated with 1/2 Cup water 1 Cup Freeze dried Tomato Dices, rehydrated with 1/2 Cup water 1/4 Cup Freeze Dried Chopped Onions + 1/4 Cup water 1/4 Cup Freeze dried Chili Peppers + 2 Tbsp water 2-3 Tbsp cilantro 2 Cups Freeze dried Cheddar, rehydrated according to package directions Pinch of Cayenne, if hot and spicy is desired Ideas for garnish: Sour Cream Avocado Black olives Lettuce, chopped Fresh Tomato, diced Fresh Onion, sliced or diced Preheat oven to 350 degrees F. NOTE: If using dry beans such as Pinto, Black, or kidney, make sure to start them the night before. Dried Anasazi Beans take about 45 minutes to cook, so make sure to start those before starting the rest of your recipe, and allow them to simmer while you assemble the rest of the ingredients. Cook beans. While they cook, cook your quinoa. Rehydrate vegetables, chicken, and cheese according to directions above while the beans and quinoa simmer. When everything is cooked and rehydrated, assemble as below: In a large bowl, combine cooked quinoa, rehydrated corn, chicken, onions & peppers; add about 3/4 of the rehydrated tomatoes, cooked beans, half of the Easy Enchilada Sauce, and half of the cheese. Mix thoroughly. Place in a 2 quart baking dish. Pour the remaining tomatoes on, then top with the rest of the Easy Enchilada Sauce and the remaining cheese. Bake for 40-45 minutes until the cheese on top is bubbly and melted. Remove from oven and top with garnishes or serve hot with the toppings in buffet style, and allow diners to add their own toppings. SERVING SUGGESTIONS: - In hard taco shells with taco fixins - With corn tortilla chips - In soft taco shells like a burrito - Leftovers would be good served like Hash, with poached or fried eggs on top - How about in the GF Naan breads we like to make? - Might even make a yummy enchilada filling if you cut back a little on the quinoa and add more chicken and beans, then stuff shells, roll up, place in baking dish and pour sauce over then bake and cover with cheese! YUM Vegetarian? Make this recipe without the chicken and add a can of chick peas. For years I have use an almond meal gluten free pie crust when making baked goods, and it was okay, but it was never quite like the old fashioned pie crust that Dad used to make. A while ago I decided to try Dad’s old handwritten recipe, but substitute THRIVE Gluten Free Flour for the white flour, butter for the lard (YUCK! Unclean lard!), and Himalayan Pink sea salt for the iodized salt. I also knew that I would need to add something to pull it together and bind the ingredients. I wasn’t looking for a grainy look, so I knew I didn’t want to toss in my usual ground Chia Seeds to hold it all together. Instead, I decided to toss in an egg and see what would happen. I knew I would be using this recipe to make Gluten-free Hearty Chicken Pot Pie, so I also was not interested in anything sweet. Definitely leaning more toward a savory crust. This was one of the most unnerving experiments in the kitchen, but one with some of the best results ever tested in our kitchen. Not only the best results, but consistent results because it has worked the same way each time. I like to try to keep things as simple as possible, and this recipe is no exception. This one can be easily altered to use with fruit pies, savory pies, and we are even looking at using it for making calzones, stromboli, and maybe even breakfast tarts filled with eggs and vegetables. With a simple, plain flavor to the initial recipe, you can easily add sugar for sweet pies, herbs for savory ones, and even Italian spices for the calzone or stromboli. Try this crust recipe with THRIVE Gluten Free Flour and send us your ideas of how you used it for your family! (NOTE: This recipe was originally created using THRIVE Gluten Free Flour, but is easily altered to use other brands as well. You may need to cut down just a little on the amount of flour, and add a little more as needed if it is too soft to work with). GLUTEN FREE Pie Crust 2 Cups THRIVE Gluten Free Flour 1/2 tsp Himalayan Sea Salt 1/2 Cup Butter, softened, NOT melted 1 Egg 2/3 Cup Water (start with 1/3 and then add 1 Tbsp at a time until dough is right consistency) Preheat oven to 425. In a bowl, mix together THRIVE GF Flour and salt. Mix in softened butter until crumbly. Add egg and 1/3 cup water, mix well. As needed, add 1 Tbsp additional water until dough is the consistency of soft pie crust. This dough is not likely to be dry, like old fashioned pie crust, and may be too sticky for rolling pin. NOTE: Experience shows that when it is as dry as old fashioned crust, it crumbles and does not hold together well when transferring to the pie plate. I prefer this dough, softer, like a stiff cookie dough, so that it may be spread with the fingers. Making a dessert pie and want the crust a little sweet? Add your sugar to the flour and salt mixture. How about a savory crust for a pot pie or dinner pie? Add the desired spices with the dry ingredients and mix thoroughly. Divide the dough into two pieces, slightly less than 2/3 of dough for the bottom of the crust and slightly more than 1/3 for the top crust. Place large piece of dough in the bottom of a 9 inch pie plate, flatten with the palm of the hand, then spread the dough evenly throughout the pan and up the sides, leaving a high enough edge to seal the top crust. Prick the bottom with the tines of a fork so that steam may escape and crust will not bubble up. Place in a preheated 425 degree oven for approx. 8-10 minutes, not allowing it to brown or cook fully. While crust is baking, liberally sprinkle GF Flour or Oat flour on wax paper or parchment. Place the small piece of dough on the floured paper and flatten with palm of hand. Sprinkle top with flour and then gently press with hands to the size of the top of the pie plate. When Pie crust bottom is ready, add filling to crust. GENTLY cover the top of the pie with the top crust, trying to close all the edges with the crust so that the filling does not spill over in the oven. Prick the top of the crust to allow steam to escape while baking. Place pie in the oven and cook according to pie recipe directions. Remember to cover the outer edges with foil to prevent burning if the baking time is long, like for an apple or pot pie. 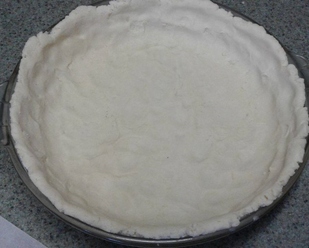 From the top you can see how I pressed the dough into the pie plate. It is important to spread it evenly so there are no thin spots that will burn. 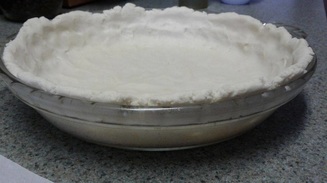 A Side view of the crust. Here you can see how the edges have been brought up high enough to be pinched together with the top crust once it is placed on top. 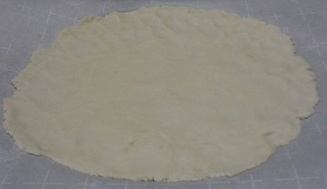 You may be able to roll out the dough for the top crust a bit with a rolling pin, but most of the work will be done by hand. When placing the circle on top of your filling, be careful to not break the top crust. Seal the edges as best as possible so that the filling doesn't leak.  If you have already seen or tried our Perfect Gluten Free Pie Crust recipe we have, then you saw I mentioned a Hearty Chicken Pot Pie. This filling is also Gluten Free and uses just a little bit of the THRIVE Gluten Free Flour to make the Roux and thicken the filling for a nice, old fashioned pot pie like Gramma used to make. This one is packed full of great freeze dried products and lots of veggies for a delicious dinner for at least four. It can be made in a round pie plate or even a square baking dish. For ease of printing, we have even included the recipe for the THRIVE Gluten Free Pie Crust at the end. GLUTEN FREE Homemade Hearty Chicken Pot Pie Filling 1/3 Cup butter 1/2 to 3/4 Cup Freeze dried onions + 1/3 +/- Water, in a small bowl 1/3 Cup THRIVE GF Flour 1/4 tsp Black Pepper 1 3/4 Cups water to which has been added 1-2 tsp of Vegetarian Chicken Bouillon (To taste) 2 Tbsp Powdered Milk + 2/3 Cup water 1 1/2 Cups Freeze Dried Chicken Chunks + 3/4 Cup Water, in a medium bowl 1 Cup Freeze Dried Corn + 1/3 Cup HOT Water 1 Cup Freeze Dried Peas + 1/3 Cup HOT water 1/4 Cup Dried Carrots + 1/4 Cup HOT water 1/2 Cup Freeze Dried Celery + 4 Tbsp Water 1 Cup Freeze Dried Potato Chunks + 1 Cup Water (Potatoes are Optional) NOTE: If I am looking for a hearty, thick pot pie filling, I use the amount of vegetables and meat listed. If looking for a little more saucy filling, reduce potato chunks, peas, corn and chicken by 1/4 Cup each, and slightly reduce the amount of water used for rehydrating these items. Preheat oven to 425 degrees Fahrenheit. In a large sauce pan, melt the butter, then add the onions and cook till onions are “clear”, to bring out their flavor. Remove from heat. Add 1/3 Cup THRIVE GF Flour and black pepper, stir to mix well. May be a little dry, but try to mix in all the flour with the butter. Then add the milk and whisk together well. Add the water with the bouillon already dissolved. Mix well. Replace pot on burner and cook on medium-high to high heat until mixture thickens like gravy. Remove from heat and add re-hydrated vegetables and chicken. Pour into prepared crust, carefully place top crust on top of pie and seal edges well to prevent dripping into oven as it bakes. Poke holes in top crust to release steam while cooking, then place in a 425 oven and bake for 30-40 minutes, until crust is golden brown and pie is hot and bubbly. Remove from oven and set for 10-12 minutes to allow filling to set before serving. NOTE: Is best to place a drip pan below the pie as it bakes, just in case the pie drips and to hopefully prevent smoke in the kitchen! :-) THRIVE PERFECT GLUTEN FREE PIE CRUST Gluten Free Pie Crust 2 Cups THRIVE Gluten Free Flour 1/2 tsp Himalayan Sea Salt 1/2 Cup Butter, softened, NOT melted 1 Egg 2/3 Cup Water (start with 1/3 and then add 1 Tbsp at a time until dough is right consistency) Preheat oven to 425. In a bowl, mix together THRIVE GF Flour and salt. Mix in softened butter until crumbly. Add egg and 1/3 cup water, mix well. As needed, add 1 Tbsp additional water until dough is the consistency of soft pie crust. This dough is not likely to be dry, like old fashioned pie crust, and may be too sticky for rolling pin. NOTE: Experience shows that when it is as dry as old fashioned crust, it crumbles and does not hold together well when transferring to the pie plate. I prefer this dough, softer, like a stiff cookie dough, so that it may be spread with the fingers. Making a dessert pie and want the crust a little sweet? Add your sugar to the flour and salt mixture. How about a savory crust for a pot pie or dinner pie? Add the desired spices with the dry ingredients and mix thoroughly. Divide the dough into two pieces, slightly less than 2/3 of dough for the bottom of the crust and slightly more than 1/3 for the top crust. Place large piece of dough in the bottom of a 9 inch pie plate, flatten with the palm of the hand, then spread the dough evenly throughout the pan and up the sides, leaving a high enough edge to seal the top crust. Prick the bottom with the tines of a fork so that steam may escape and crust will not bubble up. Place in a preheated 425 degree oven for approx. 8-10 minutes, not allowing it to brown or cook fully. While crust is baking, liberally sprinkle GF Flour or Oat flour on wax paper or parchment. Place the small piece of dough on the floured paper and flatten with palm of hand. Sprinkle top with flour and then gently press with hands to the size of the top of the pie plate. When Pie crust bottom is ready, add filling to crust. GENTLY cover the top of the pie with the top crust, trying to close all the edges with the crust so that the filling does not spill over in the oven. Prick the top of the crust to allow steam to escape while baking. Place pie in the oven and cook according to pie recipe directions. Remember to cover the outer edges with foil to prevent burning if the baking time is long, like for an apple or pot pie. 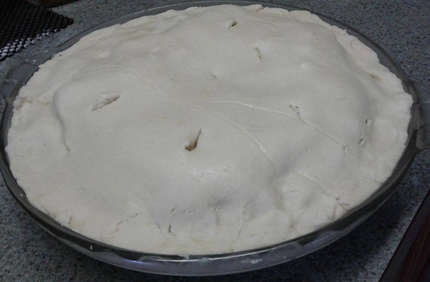  These two photos are pre-baked. I wanted to be able to show how the crust fits easily on top. Make sure to poke holes to let steam escape as it cooks. 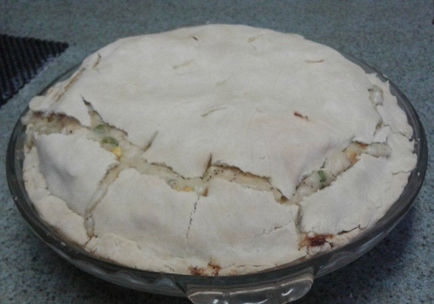 The crust didn't feel too dry when I rolled and pressed it out, but the finished product shows that I must have added just a tiny bit too much flour. Not the perfect pot pie model - but it sure did taste delicious! This recipe amazes me because it tastes just like an old fashioned "normal", wheat filled pot pie, yet it is all gluten free! Some recipes are meant to be eaten fresh right from the oven, while others are great to put away, already to go for later or the next day. This recipe is one that can go either direction, eaten fresh or refrigerated for later, depending on your need. We often use casserole recipes for times when we know we are going to be busy and have little time to cook the next day. Mixing them ahead and sticking them in the fridge makes the next day’s preparations a lot less hectic and more relaxing for the family.
Our THRIVE Risotto with Brown Rice, Chicken, and Spinach is one of those easy to toss together, and great to stick in a covered dish away for later. After a long day at work or running errands, just pop it in the oven for about 30 minutes at about 425 degrees F and you have a great dish to toss on the table with a fresh salad or even some garlic dinner rolls. Risotto with Brown Rice, Chicken, and Spinach 1 1/2 Cups Instant Brown Rice 2-3 Cups water 2 1/2 tsp Vegetarian Chicken Bouillon Bring rice to a boil, reduce heat to simmer and allow rice to cook, thoroughly, while you prepare the rest of the ingredients. Stir occasionally to prevent burning. 3/4 Cup Freeze dried Parmesan Cheese, rehydrated (additional for sprinkling on the top or for serving) 3/4 Cup Freeze Dried Mozzarella Cheese, rehydrated 1 1/2 Cups Freeze Dried Spinach + 1/2 Cup water, mixed gently in a bowl 1/2 - 1 Cup Freeze Dried Onion + 1/6-1/3 Cup water, mix in medium bowl 1/2 Cup Freeze dried Green Onions + 1/8 Cup water, mix in small bowl 1 1/2 Cups of Freeze Dried Chicken Chunks + 3/4 to 1 Cup water, mix in a medium bowl 1 Lemon, Cut into thin slices (Optional) 3 Tbsp butter or olive oil 5 cloves Garlic, chopped 1/4 Cup fresh parsley, chopped, or 1 1/2 Tbsp dry Parsley 1/2 Cup Dry White Wine (may also use grape juice) Optional 2 Tbsp Lemon Juice Additional 3 Tbsp Butter, melted Salt and Pepper to taste Cook Rice in water with Bouillon until soft. Set aside, covered. Rehydrate the onions, scallions, and spinach each in a separate bowl with their appropriate water. Next, rehydrate chicken in the 3/4 to 1 Cup of water for approx. 10 minutes. While that is rehydrating, place the first 3 Tbsp Butter or Olive Oil in a large fry pan and heat on medium high heat. Add the garlic, rehydrated onions, scallions, and lemons. Saute lightly, then add the spinach and parsley and saute just until heated through. Reduce heat and add the rice, and chicken to the spinach mix, and mix through, gently. Pour Parmesan cheese, lemon juice and melted butter into the pot and stir thoroughly, to mix. Season with salt and pepper, if desired. Serve immediately. NOTE: This recipe is great for Shabbat (Sabbath Meal) - make it on Prep day and place it in a 9 inch round pie plate or 8-9 inch baking square dish, sprinkle with additional Parmesan cheese and cover. Reheat, covered, for approx. 25-35 minutes in a 425 oven the next day! You may need to drizzle about 1/3-1/2 cup of water over the rice before baking to ensure it does not dry out in the oven.
Easy Enchilada Sauce Recipe
2 Tbsp THRIVE Gluten Free Flour, cornstarch, or flour (optional for thickening) 2 Tbsp Chili Powder 1/2 tsp Cumin Kosher or Sea Salt to taste 1/4 tsp black pepper 1 Tsp olive oil 4 cloves Garlic, crushed (Garlic powder may also be used) 3 Cups Water 1 Cup Freeze Dried Tomato Powder 2 tsp Vegetarian Chicken Bouillon 1-2 Tbsp Cilantro 1/2 Cup Freeze Dried Chili Peppers 1/2 Cup Freeze Dried Chopped Onion Optional ingredients to taste: onion powder garlic powder cayenne, for hot and spicy In a small bowl combine the flour with the cumin, chili powder, salt and pepper. If not using thickener, mix together the spices until well combined. In a saucepan, place your olive oil and crushed garlic or garlic powder and lightly saute to bring out the flavor. Remove from heat. Gently add the water into the saucepan, and whisk in the Tomato Powder with 2 tsp Vegetarian Chicken Bouillon. Make sure to whisk this together well so that all the tomato powder is mixed in. Toss in your spice mix. Whisk till combined then add the cilantro, Freeze Dried Chili Peppers and Freeze Dried Chopped Onions. Stir thoroughly to combine. Replace the pot on the burner and bring to a boil on medium-high to high heat. Reduce heat and simmer until thickened, about 15 minutes |
Prepping Expert
AuthorJudith has over 30 years experience in food storage, herbs, essential oils, and prepping. She was a captain in the USAF-AUX, FEMA trained, Community Emergency Response Team member and NRA marksmanship award recipient. She shares her experiences with her readers offering tips and recipes. Disclosure
The information shared is our personal opinion and should NEVER be considered a substitute for professional medical, nutritional, or other expert advice. Information contained is not for the purposes of diagnosing, or treating any disease or medical condition. Any endorsement of products should not be considered an un-biased review since we are paid and compensated when you purchase products from this site.
Archives
March 2024
Categories
All
|
||
 RSS Feed