|
There is a story behind this dessert - in a pinch, I needed a quick and delicious recipe to serve for a holiday dinner, but had not yet used my Freeze Dried Granny Smith Apples for an apple crisp. I pulled out my "Old-faithful" recipe and realized I have changed since I made that one last - I don't eat much sugar or sweetener any more. And when I do make desserts, I really do prefer them to be less sweet than what others will like. I wanted a wonderful flavor, but a dessert that is a little bit better for you than a traditional apple crisp. By comparison, my original recipe used a whopping 3/4 cup of sugar and only 1/2 cup of oats!!! So I jumped in, threw things into the bowl and, because I have finally learned to keep pen and paper handy when creating, I wrote down each ingredient as I measured. For us, this one had just the right amount of sweet which left the Apple crisp with a great sweet-tart flavor with the crumble topping and the Freeze Dried Granny Smith apples. You could add more sugar if you like things that way, but try it once this way first and see what you think! Gluten Free, Lower Sugar Apple Crisp 4 Servings (Can be doubled and baked in a larger dish for more servings) 4 Cups Freeze Dried Granny Smith Apple Slices Enough water to rehydrate to a soft, but not squishy, apple slice. Baking will dry them out a bit so you want to add just a little more (approx 1-2 Tbsp) than is called for on the can. Pour the water over the apples in a plastic dish, place lid on top tightly and set aside. Gently shake every now and then to evenly rehydrate. In a separate bowl, Mix together: 1 Cup Quick Oats 2 Tbsp Ground Flax Seed 1 Tbsp Ground Chia Seeds 3 Tbsp butter, SOFT, not melted! 1 tsp Cinnamon heaping 1/8 Cup Brown sugar (I also added 1/2 Tbsp molasses for a more intense flavor) 1/2 Cup chopped walnuts or pecans Butter a small baking dish (about 8 inch round) and place your rehydrated apples evenly across the bottom of the pan. If you like a thicker apple layer, you can add additional rehydrated apples. Gently sprinkle the crumble mixture on top of the apples, trying to spread evenly and covering the apples as much as possble so they do not brown in baking. Place in a preheated 350 degree oven for 20 minutes. Remove from oven, allow to cool. Serve room temperature with some whipped cream, ice cream, caramel sauce, or just plain! Goes great with a cup of hot coffee or a mug of hot tea. I enjoy having this recipe around in a jar for whenever I am in the mood for something different. It is easy to make with products from your food storage, and keeps for a month or two if it lasts that long. It is even better for you and the kids than those sugary cereals you could be buying at the grocery store.
Granola is great with milk in the mornings, sprinkled over fresh fruits like berries, melons, or even sliced apples. How about serving it over a bowl of ice cream or your favorite frozen yogurt? Mix it in with your kefer or yogurt for a hearty afternoon snack or filling balanced breakfast. It is even a quick and easy crunchy snack to just grab and nash. One of the reasons I enjoy this recipe is because it is versatile, can be changed by adding different nuts or dried fruits and is packed full of nutritious seeds and grains. Also, uses your favorite honey rather than sugar for sweetening. Do you want a slightly stronger flavor? Add a little bit of molasses along with the honey for a darker, richer taste. No matter how you mix it up, it is still tasty, filling, and packed full of goodness. Higher Protein Gluten Free Granola 1 Cup Quinoa 1 Cup Quick Cook Oats 1/4 Cup ground flax 1/4 Cup ground Chia seeds 1/2 Cup Shredded Coconut 1/2 Cup Peanut Flour 3/4 Cup Honey, melted 1 Tbsp Oil Preheat oven to 300 degrees. Put quinoa on a cookie sheet with sides. Place in preheated oven and roast for about 7 minutes. Remove and pour into bowl. Add the rest of the dry ingredients. Mix well until coated with Peanut Flour. Drizzle honey over the mixture then drizzle oil over. Mix well until thoroughly coated. Lightly oil the same cookie sheet used before, and spread granola mix in a thin layer on the cookie sheet. Place in the oven and cook for about 15 minutes. Remove, stir, bringing the sides into the middle and mixing well. Place back in oven for 10 minutes, checking occasionally to ensure it is not burning. Remove from oven and allow to cool thoroughly before placing in an airtight container or bag. Served as a topping over ice cream or fresh fruit, or as cereal in the morning with cold milk. Granola can also be eaten as a snack or packed for travel. Granola can be easily varied by adding different spices, flavorings like almond or maple, and adding dried fruits and nuts. It is a versatile recipe to add to your storage portfolio and can be whipped up in no time at all. Recipe is also easily doubled, but may need an additional pan to be baked in to make sure you spread it thinly and evenly for even baking. 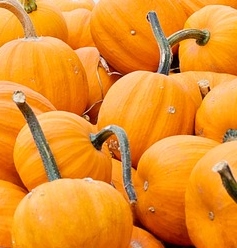 Around this time of year, squash and pumpkins are everywhere. This is great time to grab a bunch and put up some pumpkin or squash puree in the freezer or canning cupboard for use over the winter season. And, what better treat to serve while you enjoy the fresh smell of chilly Autumn air than a tasty slice of pumpkin bread? Well, I guess you could eat those wonderful fudge brownies I posted earlier, but if you aren't a big chocolate fan or aren't in the mood for those, our gluten free pumpkin breads are another great choice! These loaves can easily be frozen, too, for later - if they last that long! This recipe is extra special as it is made without eggs. Great for your home storage cookbook or recipe box. For those looking for a dairy free recipe, this one's not it. It does work better with milk for some reason than with almond or other nut milk. You are welcome to try it that way, if you like, and let me know what your results were! Would love to hear. Gluten Free, Egg Free Pumpkin Bread 2 Loaves 3 1/2 Cups Gluten Free Flour 2 Cups Sugar ( I used 1 1/2 Cups) 2 tsp Baking soda 1 tsp salt 2 tsp Pumpkin Pie Spice 1-16 oz can of Pumpkin Puree (Organic comes in 15 ounce can. I used this plus 1/4 Cup extra milk) 1 Cup Olive Oil 2/3 Cup milk 1 tsp Vinegar Preheat oven to 350 F degrees; oil 2-9X5 loaf pans. I also like to line my pans with parchment paper for easy removal of loaves. If using non-stick pans, no need to oil them. Mix all dry ingredients together well. In a separate bowl, mix all the wet ingredients. Pour the wet into the dry and mix together just till well combined. Do not over beat. Separate the batter evenly between the two pans and place in the oven for 45-50 minutes until a toothpick inserted in the center comes out clean. Cool in the pan 30 minutes, then remove and cool on a wire rack. Place in a bag or container for storage. Delicious with a slab of cinnamon butter slathered all over it, or a little dollop of cinnamon sour cream made with some milk or water and Sour Cream Powder. I love food storage. I love chocolate. And I love autumn. Now let's put the three together and make something delicious to enjoy with a nice hot cup of tea or coffee on a chilly day. I have to be honest right from the start, this recipe is only about 60% home storage products (Cacao, Sugar, Vanilla, Gluten Free Flour) because there is nothing better than using real butter and fresh eggs in a fudgy brownie recipe, and it is one of my absolute favorites. I love this recipe because it is gluten free, quick, AND delicious!
Gluten Free Fudge Brownies 16 Brownies 1/2 Cup plus 2 Tbsp Butter, melted 6 Tbsp Cacao powder (preferred over cocoa, but cocoa can be substituted) 1 Cup Sugar 2 Eggs 1 tsp vanilla 1/2 Cup Gluten Free Flour Pour Melted butter into mixing bowl, add cacao and mix well. Mix in sugar and vanilla. Add flour and then 2 eggs and gently mix until combined. Spread in a buttered 9X9 square baking dish. Bake in 350 degree F oven for 20+/- minutes until just done, but still soft and fudgy. Allow to cool and cut into 16 squares. Enjoy! NOTE: I have made this recipe using olive oil instead of melted butter. I cut back the fat to just the 1/2 Cup and mix. It is a bit thicker to spread, but is not as greasy when baked as if you used the full 1/2 cup plus 2 Tbsp of oil. You can also substitute the full amount of fat with coconut oil, if you would prefer. But this will impart a distinct coconut flavor - which is not a bad thing! I also have cut the sugar back to just around 2/3 cup to reduce the sweet and make a more bitter-sweet or darker brownie. This can also be done in conjunction with the oil instead of butter. Although these substitutions work well, I do find that there is nothing like genuine eggs. I have used powdered, but it produces a slightly more cake-like brownie over fudge brownie. |
Prepping Expert
AuthorJudith has over 30 years experience in food storage, herbs, essential oils, and prepping. She was a captain in the USAF-AUX, FEMA trained, Community Emergency Response Team member and NRA marksmanship award recipient. She shares her experiences with her readers offering tips and recipes. Disclosure
The information shared is our personal opinion and should NEVER be considered a substitute for professional medical, nutritional, or other expert advice. Information contained is not for the purposes of diagnosing, or treating any disease or medical condition. Any endorsement of products should not be considered an un-biased review since we are paid and compensated when you purchase products from this site.
Archives
March 2024
Categories
All
|
 RSS Feed